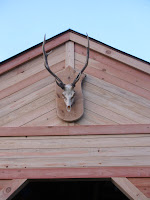
SK-1 and NAS made progress on the Guy Shack, finishing up the front of the center, garden tool, storage area that connects the original guy shack/workshop and the kaitai/butcher shop. Finished it off with a nice deer skull!
Tuesday, November 16, 2010
The Guy Shack...progress continues!
SK-1 and NAS made progress on the Guy Shack, finishing up the front of the center, garden tool, storage area that connects the original guy shack/workshop and the kaitai/butcher shop. Finished it off with a nice deer skull!
Saturday, September 11, 2010
Connected Again!
After an unintended hiatus, we are finally back! It started as a planned break while we were busy with our full time jobs and lots of projects around the house. Bright idea number one was to purchase a new PC, and that went well, for an hour. The next bright idea was to upgrade to Windows 7 Ultimate. Sounded great to be able to use both languages (Japanese and English), but we collectively know only enough about computers to be dangerous. 60 days later we begged U-1-3 to come over and unscrew our system. Turns out our incompetence was compounded by our cable modem not being compatible with W-7 Ultimate. U-1-3 fixed it all in minutes!!!
I am in the process of manually searching for all of the favorites we lost in the swap! Looks like we will be back blogging over the next few days!
SK-1 Out!
I am in the process of manually searching for all of the favorites we lost in the swap! Looks like we will be back blogging over the next few days!
SK-1 Out!
Monday, April 27, 2009
After the rain
Tuesday, March 3, 2009
The "in your kitchen" Soil Test
To determine the basic composition of your garden/lawn soil, try this simple home test: Lots of books and web sites have detailed instructions. Here are some simple instructions:This is a 2 day process:
1 quart jar with lid
1 cup of air dried soil
1 marker
1 teaspoon plain dish washing detergent
Water (2/3 jar)
Put all ingredients in the jar:
Shake hard for 5-10 minutes until all soil particles are broken up (the soap helps this process).
Let sit for exactly 2 minutes and mark the level that has settled to the bottom of your jar. This is your 'sand' portion.
Let settle for 2 hours and mark this level. This is your 'silt' portion.
Let settle for 2 days and mark this level. This is your 'clay' portion.
Record the measurements as fractions, and then convert to percentages (yes, it is time to refresh our math skills).
Loam is a 40/40/20 mix and is an ideal growing medium. Consult a reputable source for more details on recommended mixtures, and ways to adjust your mixture for your particular needs. I would start with http://www.norganics.com/applications/texture.pdf or http://www.oznet.ksu.edu/kswater/soil_texture_SPan.htm. Remember, try to use organic fertilizers whenever possible!
BTW, our garden tested out at a 50%/45%/5% mix of sand/silt/clay. Not perfect but now I have a starting point!
Now, put on your coveralls and get to work in your garden!
March Snow!
Since we tilled the garden this past weekend, of course it had to snow today! We have had having significant snowfall all day and more is expected tonight. Our workplaces were shut down early due to the snow so I had to snap a few pictures in the yard. Enjoy!
The freshly tilled garden: Our house, viewed from the rice field:
Sunday, March 1, 2009
Since our house was newly constructed the local Fire Prevention/Volunteer Firefighter Association conducted a "HiBuSe" ceremony. They set up their firefighting pumper and sprayed the house down as a way to hope for no fires. The Nagatsuka "KaBouTai" came out on this cold day and made the spray.
Labels:
kaboutai,
nagatsuka,
volunteer fire association
The Garden-2009
Our first year garden:
SK-1 tuned up the roto-tiller (KoUnki) yesterday and hit the field first thing this morning. Last spring we layed a 4 inch layer (1 ton) of half-composted cow manure over the garden. Today it was tilled in and the result was a good mix of former rice field soil and SOM (Soil Organic Matter). Next week I will transfer the humus created over the last 6 months in our compost bins. Since we still have the chance of frost for another 3 weeks, we will let this sit for 2 weeks and then test the soil before our first planting.
A little bit of wall maintenance last week stabilized the walkways (Aze Michi) next to the rice field water supply/drain troughs (Aze). Field rocks made the perfect, and free, material. This improved walkway will allow plantings all the way to the propoerty line, mazimixing planting area!
SK-1 was "Caught working"
Ko Unki (Roto Tiller) in the back of the "Monster Truck"
SK-1 was "Caught working"
Ko Unki (Roto Tiller) in the back of the "Monster Truck"
Tuesday, February 24, 2009
the "West Wing"
our "Library"
With some of our gear moved to the storage loft, it was time to work on our home "library" in the master bedroom. Here is "before""During" (with Sk-3 inspecting the job site):
The shelves are in! Load them up with books!
Its time to get on amazon.com and buy more books...
A bed to sleep in!
The Storage Loft
We took advantage or the very high ceiling in the walk-in closet off the master bedroom and created a hidden storage loft. To keep the same style throughout the house, we anchored additional support beams along the walls, and finished the project with tongue & groove pine. Final dimensions are 1.95cm x 2.32cm with a height ranging from 98cm to 171cm.
Since we saved every bit of excess building material from the intial house build, this project cost less than 8,000 Yen (about $80 USD), but since I am a slow carpenter, this project took almost 10 hours to complete. Now our holiday decorations and off-season gear has a storage place, freeing up valuable floor space for the next projects...
Friday, January 30, 2009
Mangiare Bene!
Moonrise!
Subscribe to:
Posts (Atom)