Friday, July 11, 2008

Today's Walkabout...

Yuko-Chan and Uribo took a Walkabout today. Check out the pictures as they approach our new house...400 meters, 300m, 250m, 200m, 100m.
These show an overall outside design and our small neighborhood.


Wednesday, July 9, 2008

Interior Walls

Wall construction method is very different from US standards. I am pretty impressed!
The entire house is supported by the post and beam skeleton so the interior walls themselves are not load bearing (they support lateral loads during earthquakes not roof weight) although they may house actual load bearing posts.
The interior studs (called "mabashira" in Japanese. These are cut from "Bei-Matsu" or Douglas Fir) are fitted into dado cuts on the floor beams and overhead beams. They are glued and double screwed into position. One side (at least) is then covered with 1/2 inch plywood ("Veneer Ita" in Japanese, and commonly misnamed "Veneer") that is nailed at about every 6 inches on every post, beam, and stud. Both sides then get a final layer of tongue and groove that is glued and double nailed at every stud and post. Rolled Fiberglass insulation is also installed in certain walls depending on the heating and cooling zones in the house.
The final product is an extremely strong wall!!! The house is begining to feel really strong!


Caution: Safety Standards May Vary...

Work platforms 8 feet off the floor............Hang on!


The A/C & Heater Lines Story

This was a challenge!


From the begining of the planning this project, we required that all exterior/exposed utilities be built into the walls and as "Out of Sight" as possible. We absolutely cannot stand the type of sloppy, afterthought utility installation that is far too common in Japan. Our builder understood this and we want nothing to take away from the beautiful design of this home. (I enclosed a few pics to show you what we hate...)


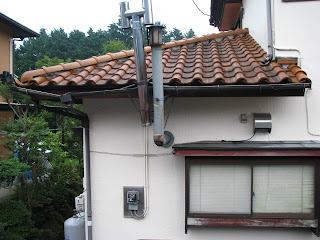
Well....the subcontractor shows up to install the combination A/C and Gas heaters. Lucky for us (unlucky for them) I was on the job site...


They tried over ruling the locations we had already chosen. They refused to run the utilities in the wall, they made up a dozen phony excuses why it could not be done, and they were only going to punch a bunch of 2 inch holes through the exterior walls and slap up some cheesy plastic conduit...or so they thought...


After a very blunt (Am I really blunt???) discussion, they were left with 2 choices...do the job as designed, or we would find a subcontractor that could follow instructions...


Check out the photos of our newly installed utility lines (in the walls and in the locations we chose). I guess the lines can go in the walls, and they made the right choice!


The Roof is Started!

The actual roof surface is now under construction! The roofers started with the front porch area. The material is a tri-metal, layered system with a protective coating. A combination of layers of aluminum, galvanized steel and tin are bonded together and then a flexible layer of a plastic material is laid on top (and adds the color), then the panels are sealed.
The roofers simply measure, cut, nail and seal. This is a 25 year roof so I will not be up there with my rappeling gear anytime soon!


Floor Insulation

Floor insulation is very important to us and our builder located a nice product for our house. Using recycled foam that is made into boards, this neat stuff rests on the main floor beams and is wedged between the floor joists. It is perfectly sized to fit and is tabbed to interlock. Just force it down between the joists and tap it up into place with a mallet and you are done! And it cuts with a framing saw or exacto knife to go around pipes and such. Pretty kool product!


Glu-Lam Posts...

As a part of the earthquake protection, and modern Japanese building code, all structural posts must be certified by the JAS. All of our structural posts are made from Western Hemlock in the 5 layer Glue-Lamination "GluLam" style. These provide a maximum level of combined load bearing strength, twisting and/or warping resistance, and lateral load strength in the event of an earthquake. The detail is hard to see but the right side of the pictures shows the flat surface and the left side shows the 5 layers laminated together.


Down Lights...

We wanted Western-Style downlights but could not find them anywhere in Japan (at least not for a million bucks each!). While we were in Boston, our "D.I.Y. Advisor" (our brother-in-law Jim) turned us on to these great lights. After 30 minutes of discussion, and 5 minutes of actual work, the first one was in. They are extremely easy to use and look great! The power was turned on for them today and they are awesome! We cannot wait to see the whole set in action!
Thanks Jim!!!